Managing Injection Pain and Bruising | Beginner Tips
Published: 2026-01-14 08:16:00 | PEPTEX Research
Why Injection Anxiety Is Normal (And Temporary)
Nearly every person who has started a peptide protocol remembers the same moment: standing in front of the mirror, syringe in hand, unable to push the needle through. The hesitation is universal. It is also, almost without exception, temporary.
Clinical surveys consistently show that injection anxiety peaks before the first three to five administrations and then drops sharply. By the second week most users describe the process as routine — somewhere between brushing teeth and applying a bandage in terms of mental effort. Understanding why the first few times feel difficult, and what you can do to make them easier, is the purpose of this guide.
One fact reframes the entire experience: a standard 31-gauge insulin needle has a diameter of roughly 0.26 mm — thinner than a human hair. The penetration depth for a subcutaneous injection is only 4 to 6 mm. At that gauge and depth, the vast majority of subcutaneous injections register as a faint pressure rather than pain.
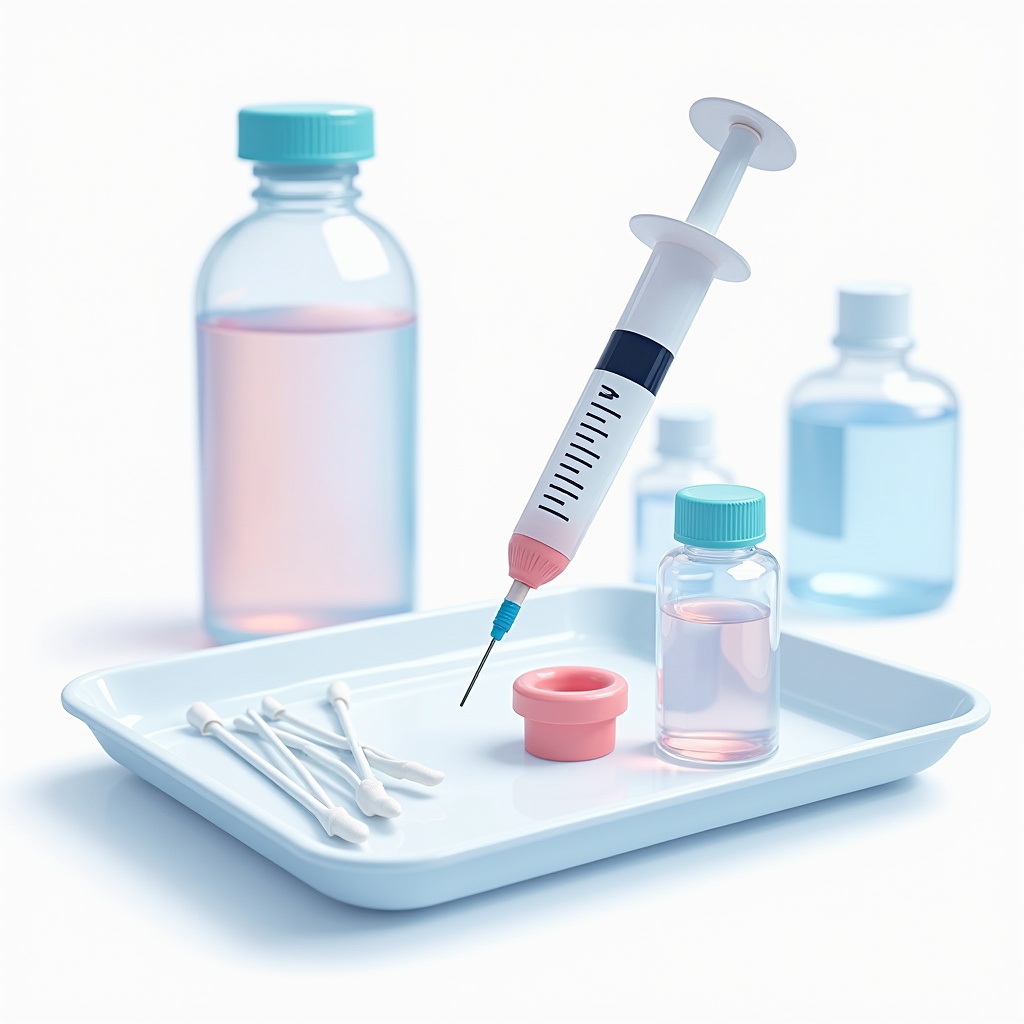
Equipment Choices That Actually Matter
Needle Gauge: The Single Biggest Variable
Gauge numbers run counterintuitively: a higher number means a thinner needle. For subcutaneous peptide injections the practical range is 27G to 31G. Here is what each feels like in practice:
- 27G (0.41 mm) — detectable skin entry, mild sting. Common in pre-loaded pens. Acceptable but not optimal for comfort.
- 29G (0.33 mm) — noticeably gentler. A solid middle ground if you draw from a vial and want faster flow.
- 30G (0.30 mm) — most users report feeling pressure but not pain. Widely available.
- 31G (0.26 mm) — the standard for insulin syringes. Thinner than a human hair. The majority of people genuinely do not feel the needle entry at all. This is the gauge Peptex recommends for subcutaneous peptide injections.
If your current protocol causes discomfort, switching from a 27G to a 31G needle is often the single change that transforms the experience. The trade-off is a slightly slower draw from the vial, which adds perhaps 10 seconds to preparation.
Needle Length
For subcutaneous injection, needle lengths between 6 mm and 12.7 mm (1/2 inch) are standard. Shorter needles (6-8 mm) work well for lean individuals. If you carry more subcutaneous tissue, a 12.7 mm needle at a 45-degree angle achieves the same subcutaneous depth without risk of intramuscular delivery.
Syringe Volume
Insulin syringes come in 0.3 mL, 0.5 mL, and 1 mL volumes. Choosing the smallest syringe that fits your dose improves accuracy. If your typical dose is 0.1 mL, a 0.3 mL syringe lets you read the markings more precisely than a 1 mL syringe would.
Preparing the Injection Site: A Checklist That Prevents Problems
Good preparation accounts for roughly half of the comfort equation. Here is a step-by-step protocol that clinical nurses follow for subcutaneous injections:
- Wash your hands with soap and warm water for at least 20 seconds. Dry thoroughly.
- Choose the site. The abdomen (at least 5 cm from the navel), the front of the thigh, and the back of the upper arm are the three standard subcutaneous sites. The abdomen generally provides the most consistent absorption and the least sensation because the nerve density there is relatively low.
- Rotate sites systematically. Never inject into the same spot twice in a row. Use a simple rotation: left abdomen, right abdomen, left thigh, right thigh. Some people note their rotation on a phone calendar. Consistent rotation prevents lipohypertrophy — small lumps of hardened fat that form when one area receives too many injections.
- Clean the site with an alcohol swab using a single outward spiral motion. Let it dry completely — this takes about 30 seconds. Injecting through wet alcohol is a common cause of unnecessary stinging.
- Let the solution reach room temperature. Cold liquid injected into subcutaneous tissue creates a noticeable burning sensation. Remove the vial from the refrigerator 15 to 20 minutes before injection, or warm it gently in your closed hand for two minutes. Never microwave or heat peptide solutions directly.
The Injection Technique: Step by Step
With your site prepared and your syringe loaded, the actual injection takes under 10 seconds. Here is the sequence experienced users follow:
- Pinch a fold of skin between your thumb and index finger at the cleaned site. The fold should be roughly 2-3 cm wide. Pinching lifts the subcutaneous layer away from the underlying muscle, ensuring the needle reaches only fat tissue.
- Insert the needle quickly. A single smooth, confident motion hurts far less than a slow, tentative push. Think of it like removing a bandage — fast is better. At 31G, most people feel nothing at all during a quick insertion.
- Angle matters. For needles 8 mm or shorter, insert at 90 degrees (straight in) while maintaining the skin pinch. For longer needles (12.7 mm), use a 45-degree angle to stay in the subcutaneous layer.
- Inject slowly. Push the plunger at a steady, moderate pace. Rapid injection forces liquid into a concentrated pocket, which can cause a temporary burning or stinging sensation. Taking 5 to 10 seconds for a 0.1-0.5 mL dose makes a measurable difference in comfort.
- Wait 5 seconds after the plunger is fully depressed before withdrawing the needle. This gives the liquid time to disperse slightly and prevents it from tracking back up the needle path.
- Release the skin fold and withdraw the needle in the same angle it entered.
- Apply gentle pressure with a clean cotton ball or gauze pad for 10 to 15 seconds. Do not rub the site — rubbing disperses the medication unevenly and significantly increases the chance of bruising.
Why Bruises Happen (And How to Prevent Them)
A bruise after an injection means one thing: a small blood vessel was nicked during needle entry or withdrawal. This is not dangerous, not a sign that you did something wrong, and not an indication that the medication was wasted. The peptide is still absorbed normally even if a bruise appears.
That said, bruises are unsightly and occasionally tender, so minimizing them is worthwhile. Here are the factors under your control:
Factors That Increase Bruising
- Rubbing the injection site — the single most common cause of post-injection bruising. Press gently instead.
- Using a thicker needle — a 27G needle nicks more capillaries than a 31G.
- Injecting into visibly vascular areas — if you can see a vein or feel a pulse near the site, move 2 cm away.
- Blood-thinning substances — aspirin, ibuprofen, high-dose fish oil, and alcohol all reduce clotting ability. If you take any of these regularly, time your injections for the trough period (for example, inject in the morning if you take fish oil at night).
- Withdrawing the needle at a different angle — this creates a wider tissue track. Exit at the same angle you entered.
Factors That Reduce Bruising
- Apply pressure for 30-60 seconds after withdrawal without rubbing. This is the most effective single measure.
- Ice the area for 2 minutes before injecting. Cold constricts blood vessels and also mildly numbs the skin. Wrap ice in a cloth — never apply directly.
- Use the thinnest gauge available. 31G is the standard recommendation.
- Inspect the site before inserting the needle. Avoid areas where you can see subcutaneous blood vessels through the skin.
- Rotate sites religiously. Previously bruised tissue is more susceptible to bruising again for 7 to 14 days.
Managing Injection Anxiety: Practical Psychological Techniques
Fear of needles (trypanophobia in clinical terminology) affects an estimated 20-25% of adults to some degree. If you experience elevated heart rate, sweating, or lightheadedness before injections, you are in a very large group. Here are techniques that research supports and that experienced users recommend:
1. Controlled Breathing
Before picking up the syringe, take four slow breaths: inhale for 4 seconds, hold for 4 seconds, exhale for 6 seconds. This activates the parasympathetic nervous system and measurably reduces heart rate within 60 seconds. Insert the needle at the end of a long exhale — your muscles are most relaxed at that point in the breathing cycle.
2. Cognitive Reframing
Replace the thought "this is going to hurt" with a factual observation: "a 31G needle is thinner than a hair, and I will feel pressure for about one second." Anxiety is fueled by vague anticipation of pain. Specific, accurate expectations defuse it. After your first painless injection, the reframing becomes self-reinforcing.
3. Distraction
Listen to a podcast, play music, or watch a video during injection. Cognitive distraction reduces pain perception by up to 40% in clinical studies. Some people find that simply talking aloud — narrating each step — occupies enough of the brain's attention to prevent anxiety from building.
4. Temperature Desensitization
Apply an ice cube to the injection site for 30 to 60 seconds before injecting. The cold numbs surface nerve endings and also gives you a competing sensation to fo...
💬 Комментарии